Blog: Introducing ClusterClass and Managed Topologies in Cluster API

Blog: Introducing ClusterClass and Managed Topologies in Cluster API

Author: Fabrizio Pandini (VMware)

The Cluster API community is happy to announce the implementation of ClusterClass and Managed Topologies, a new feature that will greatly simplify how you can provision, upgrade, and operate multiple Kubernetes clusters in a declarative way.

A little bit of context…

Before getting into the details, let’s take a step back and look at the history of Cluster API.

The Cluster API project started three years ago, and the first releases focused on extensibility and implementing a declarative API that allows a seamless experience across infrastructure providers. This was a success with many cloud providers: AWS, Azure, Digital Ocean, GCP, Metal3, vSphere and still counting.

With extensibility addressed, the focus shifted to features, like automatic control plane and etcd management, health-based machine remediation, machine rollout strategies and more.

Fast forwarding to 2021, with lots of companies using Cluster API to manage fleets of Kubernetes clusters running workloads in production, the community focused its effort on stabilization of both code, APIs, documentation, and on extensive test signals which inform Kubernetes releases.

With solid foundations in place, and a vibrant and welcoming community that still continues to grow, it was time to plan another iteration on our UX for both new and advanced users.

Enter ClusterClass and Managed Topologies, tada!

ClusterClass

As the name suggests, ClusterClass and managed topologies are built in two parts.

The idea behind ClusterClass is simple: define the shape of your cluster once, and reuse it many times, abstracting the complexities and the internals of a Kubernetes cluster away.

Defining a ClusterClass

ClusterClass, at its heart, is a collection of Cluster and Machine templates. You can use it as a “stamp” that can be leveraged to create many clusters of a similar shape.

---
apiVersion: cluster.x-k8s.io/v1beta1
kind: ClusterClass
metadata:
  name: my-amazing-cluster-class
spec:
  controlPlane:
    ref:
      apiVersion: controlplane.cluster.x-k8s.io/v1beta1
      kind: KubeadmControlPlaneTemplate
      name: high-availability-control-plane
    machineInfrastructure:
      ref:
        apiVersion: infrastructure.cluster.x-k8s.io/v1beta1
        kind: DockerMachineTemplate
        name: control-plane-machine
  workers:
    machineDeployments:
      - class: type1-workers
        template:
          bootstrap:
            ref:
              apiVersion: bootstrap.cluster.x-k8s.io/v1beta1
              kind: KubeadmConfigTemplate
              name: type1-bootstrap
          infrastructure:
            ref:
              apiVersion: infrastructure.cluster.x-k8s.io/v1beta1
              kind: DockerMachineTemplate
              name: type1-machine
      - class: type2-workers
        template:
          bootstrap:
            ref:
              apiVersion: bootstrap.cluster.x-k8s.io/v1beta1
              kind: KubeadmConfigTemplate
              name: type2-bootstrap
          infrastructure:
            ref:
              kind: DockerMachineTemplate
              apiVersion: infrastructure.cluster.x-k8s.io/v1beta1
              name: type2-machine
  infrastructure:
    ref:
      apiVersion: infrastructure.cluster.x-k8s.io/v1beta1
      kind: DockerClusterTemplate
      name: cluster-infrastructure

The possibilities are endless; you can get a default ClusterClass from the community, “off-the-shelf” classes from your vendor of choice, “certified” classes from the platform admin in your company, or even create custom ones for advanced scenarios.

Managed Topologies

Managed Topologies let you put the power of ClusterClass into action.

Given a ClusterClass, you can create many Clusters of a similar shape by providing a single resource, the Cluster.

Create a Cluster with ClusterClass

Here is an example:

---
apiVersion: cluster.x-k8s.io/v1beta1
 kind: Cluster
 metadata:
   name: my-amazing-cluster
   namespace: bar
 spec:
   topology: # define a managed topology
     class: my-amazing-cluster-class # use the ClusterClass mentioned earlier
     version: v1.21.2
     controlPlane:
       replicas: 3
     workers:
       machineDeployments:
       - class: type1-workers
         name: big-pool-of-machines
         replicas: 5
       - class: type2-workers
         name: small-pool-of-machines
         replicas: 1

But there is more than simplified cluster creation. Now the Cluster acts as a single control point for your entire topology.

All the power of Cluster API, extensibility, lifecycle automation, stability, all the features required for managing an enterprise grade Kubernetes cluster on the infrastructure provider of your choice are now at your fingertips: you can create your Cluster, add new machines, upgrade to the next Kubernetes version, and all from a single place.

It is just as simple as it looks!

What’s next

While the amazing Cluster API community is working hard to deliver the first version of ClusterClass and managed topologies later this year, we are already looking forward to what comes next for the project and its ecosystem.

There are a lot of great ideas and opportunities ahead!

We want to make managed topologies even more powerful and flexible, allowing users to dynamically change bits of a ClusterClass according to the specific needs of a Cluster; this will ensure the same simple and intuitive UX for solving complex problems like e.g. selecting machine image for a specific Kubernetes version and for a specific region of your infrastructure provider, or injecting proxy configurations in the entire Cluster, and so on.

Stay tuned for what comes next, and if you have any questions, comments or suggestions:


Source: Kubernetes Blog

Announcing HashiCorp Waypoint 0.6

Announcing HashiCorp Waypoint 0.6

We are pleased to announce the general availability of HashiCorp Waypoint 0.6. Waypoint is an application deployment tool that aims to deliver a PaaS-like experience for Kubernetes, ECS, and other platforms. Kubernetes is one of the world’s most popular deployment platforms, but there’s still too much work to go from an empty Kubernetes cluster to production-ready application deployments.

In this release, we’ve shipped a Helm-based installation method to install Waypoint with familiar tools in a couple of commands. We now support Helm as an application deployment option to make adopting Waypoint easier in existing environments.

For our YAML-free deployment options, we now support horizontal pod auto-scaling, sidecars, and Kubernetes Ingress. The result of all this work is that whether you’re writing a new application or optimizing an existing one, you can get up and running with Waypoint quickly, and it feels great on Kubernetes.

Here are some of the significant features in this release:

  • Helm-based server install: The Waypoint server can now be installed into Kubernetes clusters using an official Helm chart. Installations on other platforms remain unchanged.
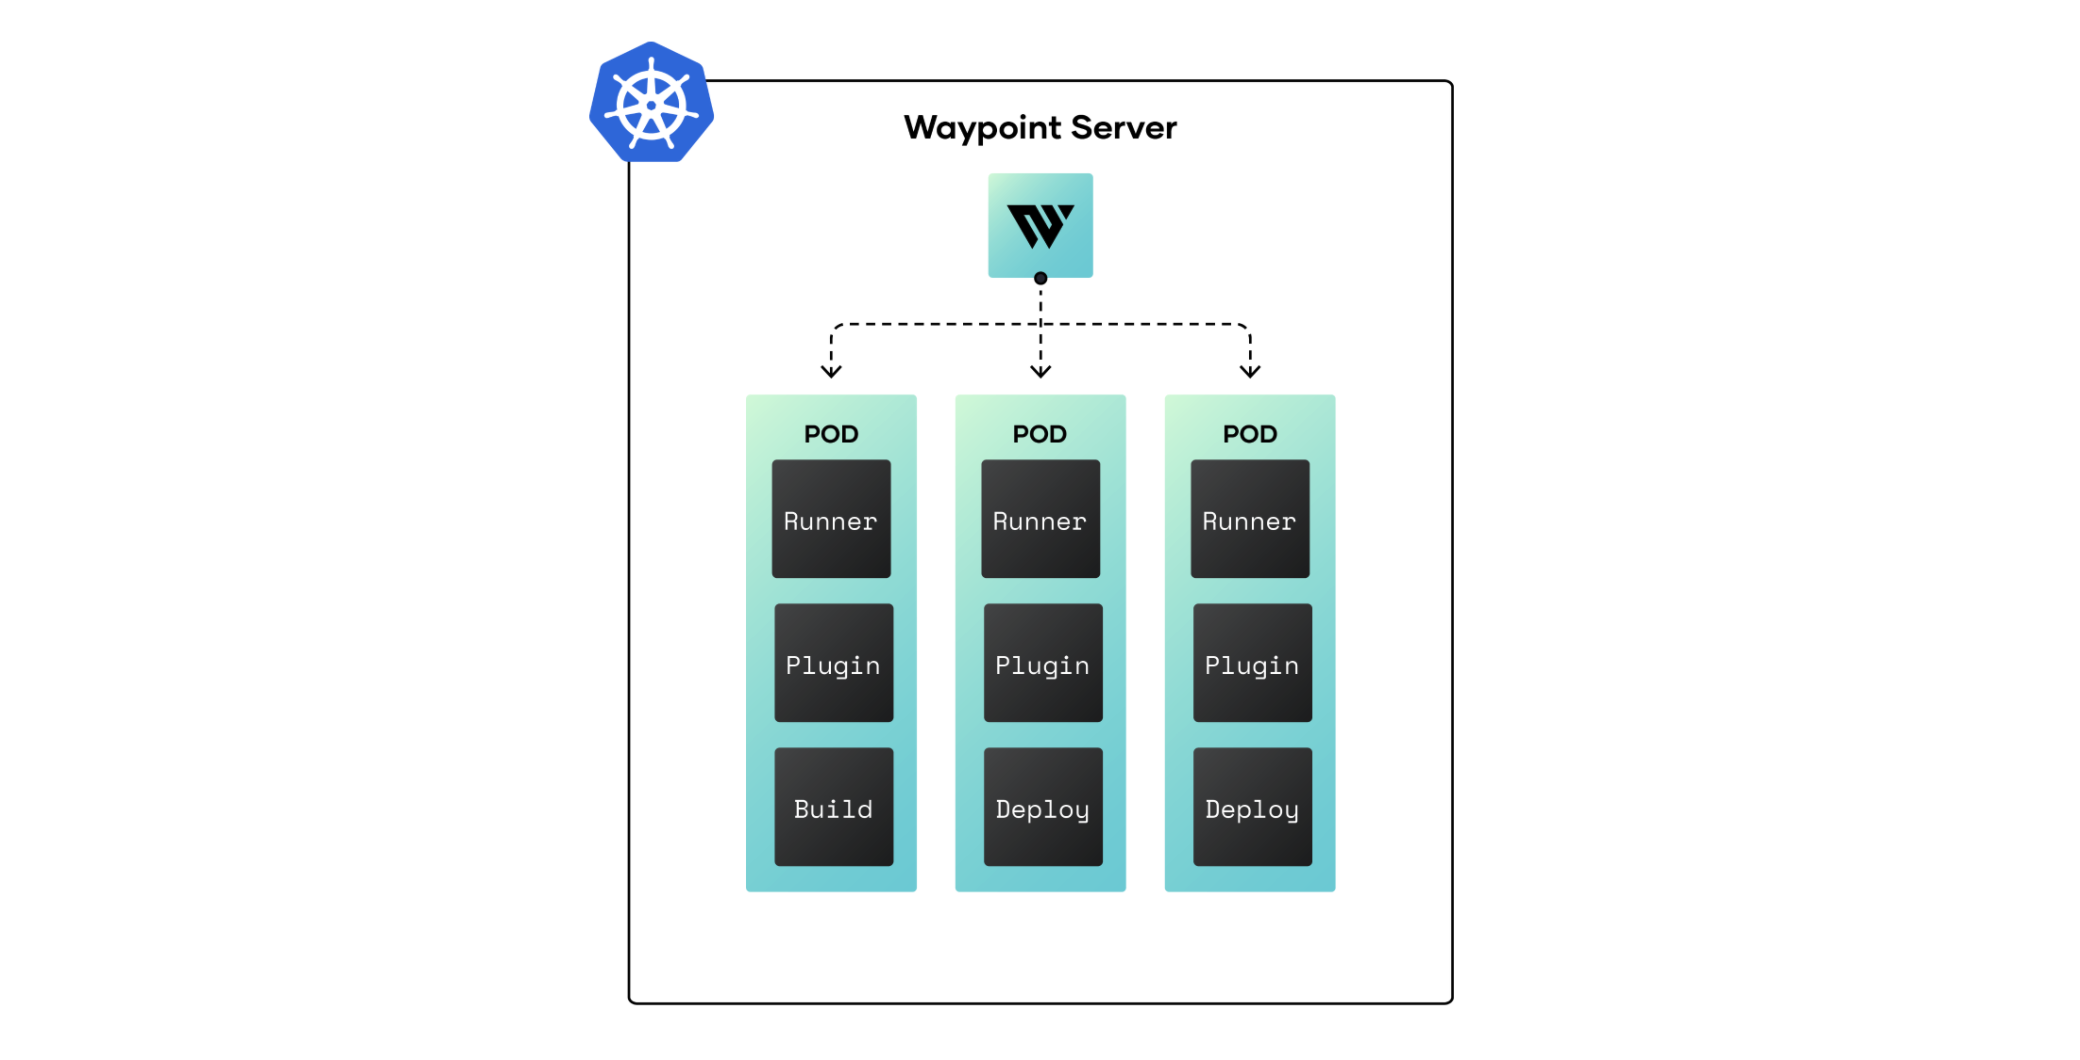
  • Docker builds in Kubernetes: Waypoint can now build Docker images directly in Kubernetes pods, enabling a secure, self-hosted remote Docker build environment.
  • Helm-based application deployment: You can now deploy your applications from Helm charts. If you already use Helm, this lets you adopt Waypoint with almost no additional work.
  • Kubernetes resources in the UI: The Kubernetes resources created for a deployment (by Waypoint, Helm, or any other plugin) are now listed in the UI along with their health status.
  • Kubernetes auto-scaling deployments: Allow users to configure an autoscaler in Kubernetes with Waypoint and its deployments when using a metrics server.
  • Kubernetes Ingress for releases: Waypoint will support releasing deployments using an ingress controller and configuring an ingress resource for your deployments.

This release includes many additional new features, workflow enhancements, general improvements, and bug fixes. The Waypoint 0.6 changelog contains a detailed list of all changes in this release.

»Helm-Based Server Install

Waypoint 0.6 comes with a new, official Helm chart to help facilitate a Kubernetes-native way to install the Waypoint server. The Waypoint Helm chart also allows for external implementations like Terraform, using the Helm provider, to install and configure Waypoint into your Kubernetes cluster.

Helm provides a direct experience to install Waypoint on Kubernetes:

$ helm repo add hashicorp https://helm.releases.hashicorp.com
"hashicorp" has been added to your repositories

$ helm install waypoint hashicorp/waypoint

Once the installation has been completed and Waypoint server is up and running, you can log in and set up your local CLI with an authentication token. From the same machine that ran the helm install, run the following command to perform an initial login to the newly installed Waypoint server:

$ waypoint login -from-kubernetes

You can then run waypoint ui to open the web UI. Please see the Installing Waypoint for Kubernetes documentation for more details.

»Docker Builds in Kubernetes Pods

Waypoint now integrates with Kaniko to support building Docker images directly within unprivileged Kubernetes pods and enable remote Docker builds within a trusted environment. When paired with our GitOps workflow, this allows an entire build-to-deploy lifecycle powered by Waypoint.

Waypoint

Waypoint previously required a privileged execution environment that could be difficult to configure within hosted Kubernetes providers. Now, Waypoint works out of the box with all major Kubernetes providers. This requires no additional configuration and automatically happens for Waypoint build operations triggered by Git or the -remote flag.

We also added a guide to using Waypoint with externally built images. Many people adopting Waypoint already have a workflow to build container images, such as through CI. In this scenario, Waypoint doesn’t need to build the image, but it still needs to know the name of the resulting image so it can be used for deployment. This guide explains how to integrate externally built images into a Waypoint workflow.

»Helm-Based Application Deployment

Waypoint now supports deploying applications using Helm. If you already use Helm or prefer to use Helm, this is the perfect option for deploying to Kubernetes with Waypoint. For people adopting Waypoint with existing applications, this is a great way to get started with Waypoint without feeling like you’re going “all-in.”

Configuring Waypoint to deploy with Helm only requires a few lines of configuration:

app "my-app" {
  deploy {
    use "helm" {
      name  = "my-app"
      chart = "${path.app}/helm"

      set {
        name  = "image.repository"
        value = artifact.image
      }

      set {
        name  = "image.tag"
        value = artifact.tag
      }
    }
  }
}

One big benefit of using Helm with Waypoint is access to dynamic information such as the artifact image and tag, as noted above. This artifact may come from a Waypoint run build step or an externally built image.

Another benefit of Helm is that it enables you to use any available Kubernetes resource since you can write any YAML resource description you want. While Waypoint provides an opinionated Kubernetes plugin that allows deployments without YAML and minimal configuration, this plugin comes at the cost of not supporting every feature of Kubernetes. Having access to Helm provides an additional first-class option.

And, you can always use different deployment plugins for other applications. One application may use Helm, another may use our opinionated Kubernetes plugin, and another may not be on Kubernetes at all. But within the Waypoint workflow, it is all uniform.

»Resource Listing in the UI

The Waypoint web UI now shows a listing of all of the platform resources created by a deployment and release. This works with all deployment plugins. All resources created will be shown in the listing, regardless of which instantiation method is used in Kubernetes

Waypoint

This allows users of Waypoint to quickly diagnose any issues. A common scenario we found in earlier versions of Waypoint was that the Waypoint deployment succeeded, but a configuration error caused the deployed application to be broken. For example, an environment variable to connect to the database might be missing. Now, users can see that while the Waypoint deployment succeeded, the launched resources may still have errors they need to resolve.

Future versions of Waypoint will continue to add additional functionality to the resource listing, such as the ability to view more details, see diffs between deployment versions, notify on status changes, and more.

»Kubernetes Auto-Scaling Deployments

In earlier versions of Waypoint, only a single pod was generated when using the opinionated Kubernetes plugin. With 0.6, Waypoint gains the ability to scale an application horizontally (increase or decrease the number of pods) by setting values for min_replicas and max_replicas fields within the autoscale stanza in a Waypoint configuration file.

A basic use case of this feature can be implemented as follows:

app “my-app” {
  build { ... }

  deploy {
    use “kubernetes” {
      cpu {
        request = "250m"
        limit   = "500m"
      }

      autoscale {
        min_replicas = 2
        max_replicas = 5
        cpu_percent  = 75
      }

    }
  }

  release { ... }
}

As you can see, configuring horizontal pod autoscaling required only about eight lines of configuration. This highlights a huge benefit of using our opinionated Kubernetes plugin: for typical applications such as web services, you can avoid writing hundreds of lines of YAML and focus on just getting your application deployed.

If you require more flexibility and configuration, we always support Helm and kubectl apply as first-class deployment plugins, but you have to manually configure features such as pod autoscaling.

»Kubernetes Ingress for Releases

Waypoint now has an additional way to configure and release your deployments in Kubernetes when using our opinionated Kubernetes deployment plugin. Users can now create an ingress resource for a release.

Unlike the other options Waypoint supports for release, an ingress resource can be configured to match certain inbound traffic that should be routed through the ingress controller to an application’s deployment. The ingress resource will use an existing ingress controller for routing traffic per release, rather than spinning up an additional load balancer, which may cost extra money and take longer to initialize.

Configuring an ingress resource for a release is as simple as defining an ingress stanza:

app “my-microservice” {
  build { ... }

  deploy {
    use "kubernetes" {
      probe_path = "/"
    }
  }

  release {
    use "kubernetes" {
      ingress "http" {
        path_type = "Prefix"
        path      = "/"
      }
    }
  }
}

»What’s Next for Waypoint?

There are many more features and improvements in Waypoint 0.6, but they are too numerous to detail in this post. For a complete listing of changes in Waypoint 0.6, please see the CHANGELOG.

One of our primary focuses is improving workflows around multiple environments (staging, production, etc.) in future releases. Working with various environments using Kubernetes today is a very manual and error-prone process. We hope that we can bring significant automation and opinionated workflows to streamline this process better.

We hope you enjoy Waypoint 0.6!

»Next Steps


Source: HashiCorp Blog